If you’re using Windows 10 and need to take a screenshot for whatever reason, you’re in luck: there are multiple ways to do it! Whether you’re trying to capture an image of your entire screen, a specific window, or a portion of your screen, there are different methods available to suit your needs. In this article, we’ll cover six different ways to take screenshots on your Windows 10 computer which can be used in any browser.
From using the Snipping Tool to keyboard shortcuts to specialized software, you’ll have plenty of options to choose from. We’ll also cover how to save and edit your screenshots once you’ve taken them, so you’ll be fully equipped to capture and use screenshots for whatever you need.
So if you’re ready to learn how to take screenshots on your Windows 10 computer, read on!
6 Ways to Take Screenshots in Windows 10
Note that the first 3 methods discussed below also work for taking screenshots in Windows 11 in case you want to upgrade your Windows 10. To take screenshots in Windows 10, you can use any of these given methods:
1. Use Function key + PrtScn to take a Quick Screenshot in Windows 10
Take a snapshot and save it as a file, take a screenshot in Windows 10 without saving it as a file, or take a screenshot of only one window using the Print Screen button on your keyboard (instead of the whole screen).
“PrtScn,” “PrntScrn,” “Print Scr,” or anything similar could be the name of the print screen button.
The button is normally located between F12 and Scroll Lock on most keyboards. To access the Print Screen option on a laptop keyboard, hit the “Function” or “Fn” key.

It will appear that nothing happened when you push the key, but the snapshot has been saved to your clipboard.
Save your Screenshot as a File
- “Windows logo key + PrtScn” should be pressed.
- You may need to hit the “Windows logo key + Ctrl + PrtScn” or “Windows logo key + Fn + PrtScn” keys instead on some laptops and other devices.
- After a brief pause, the screen will dim, and the screenshot will appear as a file in the “Screenshots” folder within your usual “Pictures” folder.
- A number is immediately assigned to the screenshot.
- If “Animate windows while minimizing and maximizing” is enabled in your visual effects settings Click on the option of System, and then click on the option of Advanced system settings.
- Select the option of the Advanced tab.
- Click Settings under the Performance section), and your screen will dim.
Take a Screenshot That Doesn’t Save?
- Press the “PrtScn” key on your keyboard. The clipboard now contains a screenshot of your display.
- Open your image in your preferred image editor, word processor, or another tool. To paste the screenshot anywhere, go to Edit > Paste.
- The image will have the same proportions as your desktop resolution.
Note:- You may need to hit the “Alt + Fn + PrtScn” buttons instead on some laptops and other devices.
Take a Single Window Screenshot
- Select the window you want to capture by clicking on the title bar. “Alt + PrtScn” should be pressed.
- As in the previous section, a screenshot of your currently active window will be copied to the clipboard.
- Copy it and paste it into your preferred picture or document editor. Note: You may need to hit the “Alt + Fn + PrtScn” buttons instead on some laptops and other devices.
Take a Screenshot of a particular Part of Your Screen
- Press “Windows + Shift + S” to take a screenshot of a portion of your screen. Your screen will become greyed out, and the cursor on your mouse will change.
- To select the section of your screen you wish to capture, click and drag on it. Your clipboard will be copied with a screenshot of the screen region you specified.
- Select the Edit option.
- Click on the Paste or press Ctrl + V to paste it in any application, just as you would a full-screen shortcut taken with the Print Screen key.
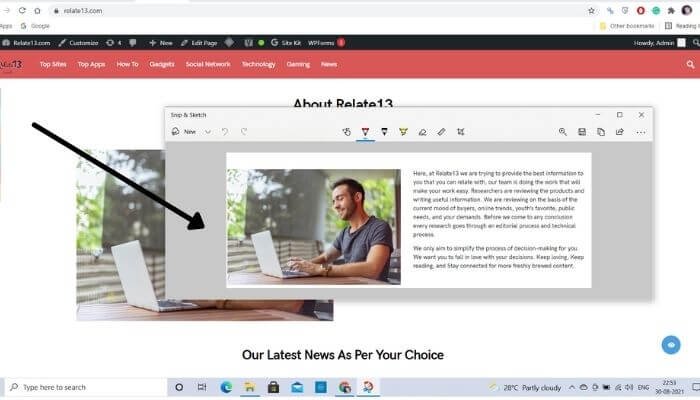
2. Take More Flexible Screenshots with the Snipping Tool

For a long time, Windows has included the Snipping tool. Apart from a few bug updates, this utility was first offered in Windows Vista and has never received any additional functionality.
A screenshot can be taken of an open window, a rectangular region, a free-form area, or the entire screen using the Snipping tool.
You can use different colored pens or a highlighter to annotate your snips, save them as an image or MHTML file, or email them to a friend.
The Snipping Tool in Windows Vista, 7, and 8 has one flaw: it can’t capture screenshots with mouse movements.
You must utilize the Print Screen method to record something that requires mouse movement, such as pop-up menus and tooltips.
Snipping Tool now has a new “Delay” option in Windows 10, which allows you to capture screenshots of pop-up menus and tooltips.
Click Delay in the Snipping Tool software. Select the number of seconds you’d want to wait for your screenshot from the drop-down list.
By selecting the arrow next to “New,” you can now select the sort of snip you want to make. There are four different sorts of snips to pick from free-form, rectangular, window, and full-screen.
Unlike a typical snip, the screen does not fade out instantly. Instead, you’ll have 1–5 seconds to set up your screenshots, depending on the delay you choose.
This is a good opportunity to open that pop-up menu or tooltip that you wish to save. The screen will freeze and fade out when your seconds have gone, allowing you to construct your snip. If you select window or full-screen, the snip will be captured immediately.
3. Use Keyboard Shortcuts with the Game Bar in Windows 10
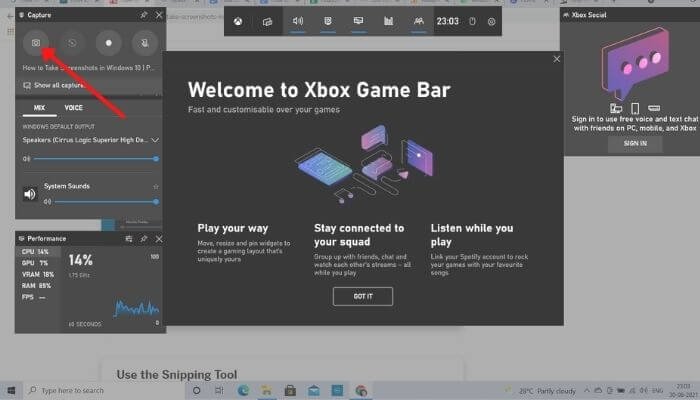
Game DVR is a feature in Windows 10 that allows you to record gameplay and screenshots from Windows PC games.
The Game Bar creates PNG snapshots, which it stores to “C: Users[your username]VideosCaptures.”
Launch the Xbox app that came with Windows 10 and visit its settings before you start utilizing the Game Bar.
Toggle “Take screenshots using Game DVR” under “Game DVR,” and assign whichever keyboard shortcuts you desire.
If requested, use the keyboard combination (“Windows key + G”) to take a screenshot, and then click or tap on the “Yes, this is a game” box if required. To take a screenshot, press the “Camera icon” or “Win + Alt + PrtScn”.
Note that the keyboard shortcut will only work if you’ve checked the “Yes, this is a game” box for this particular game.
You’ll see a notification that says “Screenshot saved.” It will open to “Xbox > Game DVR > On this PC” if you click or tap on the notification.
4. Take More Powerful Screenshots the Easy Way with Snagit
Each of Windows’ built-in methods has its own set of advantages and disadvantages. A third-party application is your best option if you take a lot of screenshots and want more versatility than the built-in tools provide.
Snagit by Techsmith is top-notch software that makes taking screenshots easily and has loads of options that help you target individual windows, create region photos, and even record the whole text of moving windows like web pages if you don’t mind investing a few dollars.
You can make short videos, annotate screenshots, draw arrows and shapes, and pretty much anything else you can think of using a screenshot tool. It’s a fantastic tool that we strongly suggest, particularly if you need to snap a lot of screenshots.
You can download a free trial to test it out before deciding whether or not to pay for it. It’ll be difficult to go back to Windows’ barebones tools after you’ve tried it.
5. Capturing a screenshot (with the Game Bar)
Windows 10 has a different feature which is the Xbox Game Bar. According to its name, it really focuses on the Gaming Zone. It is used to take screenshots from the games. People who are running gaming websites used these screenshots to aware their audience, this feature is really good for them.
You have to press Windows+Alt+PrintScreen together from your PC’s keyboard to take a screenshot of the current game. Depending on the Laptop, sometimes you have to press Windows+Alt+Fn+PrintScreen together.
6. Taking a screenshot with Greenshot (free application)
Greenshot is a free screenshot tool for Windows. It has many shortcuts. Greenshot usually runs on a system tray, which also has many options like “Capture window from list”. You can quickly take a screenshot from a running window.
Related articles that you might like:
- How To Allocate More RAM To A Game On Windows 10 PC?
- How To Fix Corrupted Files In Windows 10
- How To Open Task Manager in Windows 10 & 11?
- PCI Device Drivers Missing In Windows 10: How To Fix?
Conclusion
Taking screenshots in Windows 10 is easy and convenient, once you know the different methods and tools available. You can use the Print Screen key, the Snipping Tool, the Game Bar, or other third-party apps to capture your screen and share it with others. Whether you want to take a screenshot of your entire screen, a specific window, or a selected area, you can find a way that suits your needs. I hope this blog post has helped you learn how to take screenshots in Windows 10 and make the most of this useful feature
FAQs
Why is Prtscn not working?
There can be various reasons why PrtScn is not working. It could be due to incorrect key combinations, issues with the clipboard, software conflicts, outdated drivers, or hardware problems.
Where do I find my screenshots on Windows?
On Windows, screenshots taken using the PrtScn key or the Win + PrtScn key combination are saved to the clipboard. You can paste them into an image editor like Paint and save them to a desired location on your computer.
How do I take a full screenshot in Windows?
To take a full screenshot in Windows, you can use the PrtScn key on your keyboard. Follow these steps:
- Make sure the screen you want to capture is visible on your display.
- Locate the PrtScn key on your keyboard. It is usually located in the top right corner, labeled as “Print Screen” or “PrtScn.”
- Press the PrtScn key once. This will capture the entire screen.