Facebook is one of the most used and finest social networking apps across the world. With the emergence of new social networking apps, Facebook has also started making some new changes to view your Facebook Friends list. Some of which we are going to discuss here in detail.
There are many great options that you can opt for to make changes to your profile. For instance, you can create your close friends’ list, decide who you want to see first in your newsfeed, can also delete multiple friends on your friend’s list and organize your friend list from high to low priority, how to restrict people from seeing your private posts, and above all, how to create an acquaintance list on Facebook.
So without delaying any further, let us get back first to how you can view your Facebook friends list.
How to view your friend list on Facebook?
On the Facebook Mobile app
- Open the Facebook app on your smartphone.
- Click on your profile picture on the top left of the screen.
- While scrolling down, you will see two partitions, one is the people who have sent you a Friend Request, and the people who are on your friends’ list.
- Here you will see who you are friends with and organize them accordingly.
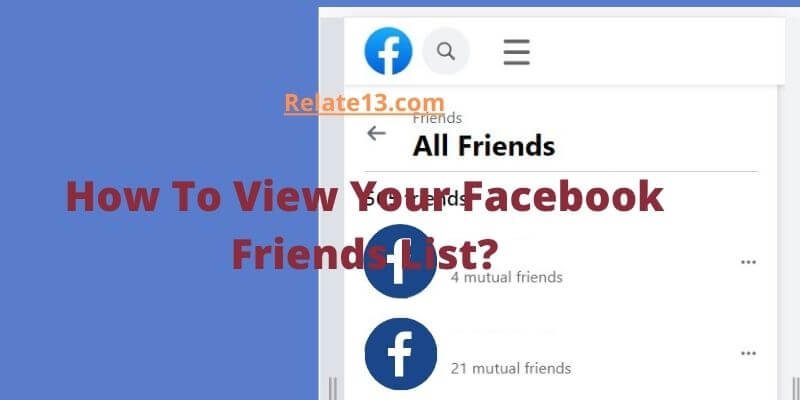
Desktop version
- After logging in to your Facebook account on the Desktop screen, you are on the Home screen of your profile by default.
- Once done, Click on All friends located on the left pane of the screen.
- Now the names will appear on the screen with whom you are friends.
- You can click on their name to view their profile.
Organizing Friends list on Facebook
On Facebook, lists may be used to organize your friends. You may use a list to send an update to certain persons, such as coworkers or neighbors. Updates from particular groups of people can also be seen (e.g. close friends, family).
You may edit these lists at any moment and add or delete friends.
Types of Friend lists on Facebook
These are the friends’ lists that Facebook helps you to create. You can organize the lists totally based on your preferences. This is the friends’ list to help you get started:
1. Close friends: So, the first priority is the people with whom you may desire to discuss your secrets. Yes! Your close friends. You can put a story on Facebook and yet restrict some people to view that.
2. Restricted: This list contains people you’ve added as friends but doesn’t want to share your information with, such as your boss. When you add someone to your Restricted list, they can only read your public material and posts that you tag them in. So you will decide, who views your profile and who’s not.
3. Acquaintances: People with whom you would wish to disclose less information. You may pick Friends except for acquaintances in the audience Choose to exclude these people when you post anything.
You may also make your own custom lists to organize your pals. So, you decide who gets on these lists and what privacy limitations (if any) apply.
How to create a new list on Facebook?
On Facebook, you may use lists to organize your friends. You may use a list to send an update to select persons, such as coworkers or friends who reside nearby.
To make a new list, go to:
1. Click Friends in the left menu of your Feed. You may need to first click See More.
2. Click Create a list, then Custom lists.
Enter a name for your list and click Confirm, then click Add friends to add the names of friends you’d want to add. Remember that you may always add or remove people from your lists.
You may also like:
- How To Find Friends on Facebook?
- Block or Unblock Someone on Facebook Messenger
- How Does Facebook Suggest Friends You May Know
Final words
Facebook helps you to connect with people across the world. With the latest features being an add-on, you are getting quite a good facility to sort people on the basis of your friends’ preferences.
Hope the guide proves useful to you!